On completion of this stage you should be familiar with the following concepts:
|
Modeling notions: |
Activated slots, Validation |
|
Modeling techniques: |
Controlling process flow, Controlling popup appearance |
|
Useful process templates: |
Branch |
|
Useful display templates: |
Alert |
We shall continue modeling the issuing of Purchase Orders (POs) by the purchaser, by adding the following features:
An alert displayed when at least one of the requisitions is marked as urgent, prompting the purchaser to process them.
An Order button used to issue a purchase order to a supplier.
This stage’s modeling should be performed in the Tutorial 11-12 project, you imported at the end of the previous stage.
When the list of approved requisitions is displayed, we would like to check whether it includes requisitions whose Urgency is Urgent.
This check should be performed immediately after the approved requisitions are retrieved from the database:
Zoom to Generate Approved Requisition List.
We shall add a process which checks if a requisition is urgent:
Add a Basic/Action. Name it Check if Requisition is Urgent. Add to it a trigger and an exit. Name the exit Yes. Mark the process as repetitive.
Create flow linking Find/<Records> to the trigger of Check if Requisition is Urgent.
Next we model the actual urgency check:
Zoom into Check if Requisition is Urgent.
Drag a Requisition database record.
Create a flow linking the trigger of Check if Requisition is Urgent to Requisition.
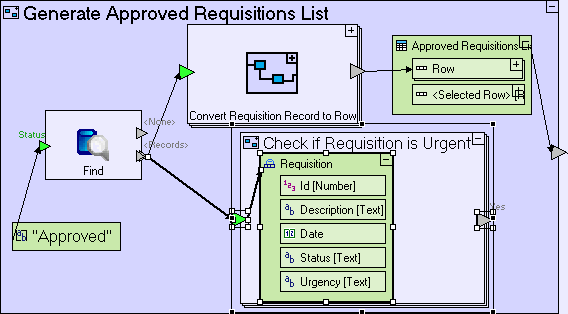
The Generate Approved Requisition List model should look similar to the following:
The check is performed using a new template Branch, which accepts a value as input and activates the exit whose name matches the value.
Add a Flow Control/Branch template (![]() ).
).
Create a flow linking Requisition/Urgency to the <Selector> trigger of Branch.
We need to distinguish between Urgent and Normal values:
Rename (pressing [F2]) the Value 1 exit to Urgent, and Value 2 exit to Normal
Create a flow linking the Branch/Urgent exit to the Yes exit.
The Check if Requisition is Urgent model looks as follows:
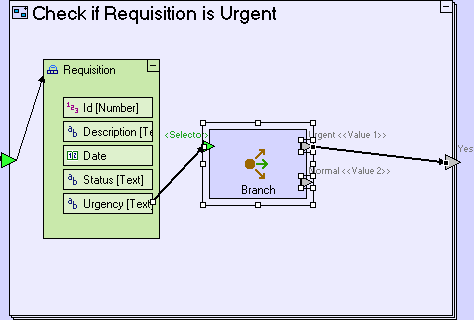
When an urgent requisition is received, Branch will activate its Urgent exit, causing an application flow that activates the Yes exit of Check if Requisition is Urgent.
Activating an exit means that regardless of whether the exit outputs a value or not, any flow originating from it will be activated, so that if the exit is linked to a trigger, that trigger will also be activated, which in-turn means that the process containing that trigger may be activated.
The functionality we are implementing does not need to perform anything when a non-urgent requisition is retrieved; therefore no flow is defined from the Branch/Normal exit. The exit can actually be deleted – we leave it here to improve the model’s readability and for possible future enhancements of the model.
If the Check if Requisition is Urgent/Yes exit is activated at least once, we would like to display an alert to the user. This is done using the Alert template.
Before we use the alert template, we should consider where in the model to position it. There are 3 options:
Check if Requisition is Urgent – in which case the alert will be displayed repeatedly for each urgent requisition.
Generate Approved Requisitions List – in which case the alert will be displayed only once, regardless of the number of urgent requisitions, but before the requisition list is populated (which occurs outside the process).
Populate Approved Requisitions List – in which case the alert will be displayed simultaneously with the requisition list being populated.
The third option seems the most plausible:
Zoom out to Generate Approved Requisition List.
Add an exit to it. Name it Urgent Requisitions Found.
Create a flow linking the Check if Requisition is Urgent/Yes exit to the Generate Approved Requisition List/Urgent Requisition Found.
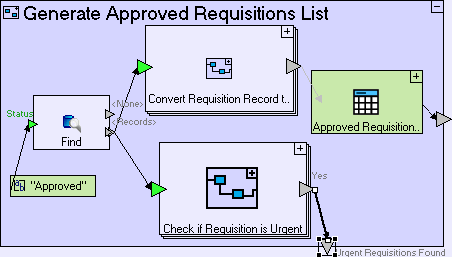
The Generate Approved Requisition List model should look similar to the following:
The alert will be displayed using the Alert template:
Zoom out to Populate Approved Requisition List.
The alert needs a message to feed its <Message> trigger:
Add a Constants/Text. Name it Urgent requisitions are waiting to be processed.
Create a flow linking the constant to Alert/<Message>.
The Alert will ultimately be activated by activating the constant holding it’s message:
Create a flow linking Generate Approved Requisition List/Urgent Requisition Found to the “Urgent requisitions are waiting to be processed” constant.
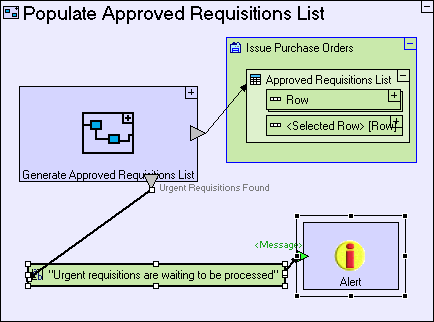
The Populate Approved Requisition List model should now look similar to the following:
Save your work, and view the application in the browser.
Click the Purchaser perspective tab.
Click the Issue Purchase Orders view tab.
You should see an alert popup, as in the screenshot below.

We shall now add an Order button to the view. It will be used in subsequent stages to issue a purchase order for a selected requisition:
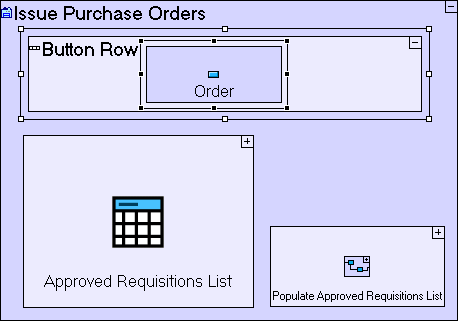
Zoom out to the Issue Purchase Orders view.
Add a Display/Row. Name it Button Row. Zoom into it.
Add a Display/Button. Name it Order.
The Issue Purchase Orders view model should now look similar to the following:
This button should open a popup for entering purchase orders, but it makes sense only if a requisition has been selected from the list:
Zoom into the Order button.
Add an ancestor reference to the Issue Purchase Orders view.
Add a Display/Popup. Name it Create Purchase Order. Add a trigger to it.
Create a flow linking Issue Purchase Orders/Approved Requisitions List/Selected Row to the trigger of Create Purchase Order.
The Order button model should look similar to the following:
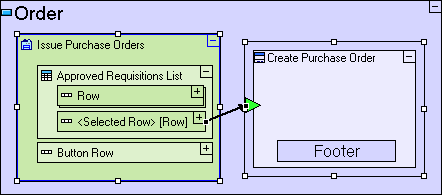
The Create Purchase Order popup will only open if Get Table Selection exits through the <Selected Row> exit, and since the selected Requisition Row data structure is also passed in the flow, we will have immediate access the details of the selected requisition inside Create Purchase Order, without having to retrieve it again.
Save your work, and view the application in the browser.
Click the Purchaser perspective tab.
Click the Issue Purchase Orders view tab.
Click the Order button (before selecting a row).
Nothing should happen, as no row has been selected.
Select a row from Requisition List.
Click the Order button.
The Create Purchase Order popup should appear looking similar to the following:

Import the sample project Tutorial 12-13 and use it as the basis for the next stage of the tutorial.
For a reminder on how to import a sample project, see the Importing a Sample Project section at the end of Stage 2.
This sample project contains all the functionality modeled thus far.
The sample project also includes additional functionality, as follows:
1. Add display elements, for displaying Requisition details in the Create Purchase Order popup. Initialize it with data from the selected row.
 |
 |
|
How to Model |
Located in |
|
Add Display/Row. Name it Requisition Row. Add a Basic/Action. Name it Initialize. Add to it a trigger. Create a flow linking the trigger of Create Purchase Order to the trigger of Initialize. |
Create Purchase Order popup |
|
Add a Display/Label. Name it Requisition. Add a Display/Number Display. Name it Id. Add a Display/Label. Name it – (hyphen). Add a Display/Text Display. Name it Description. |
Requisition Row |
|
Drag a Requisition Row (to create a display data element). Link the trigger of Initialize to it. Add an ancestor reference to the Create Purchase Order popup. Link Requisition Row/Id/<Value> to Create Purchase Order/Requisition Row/Id/<Value>. Link Requisition Row/Description to Create Purchase Order/Requisition Row/Description/<Value>. |
Initialize process |
2.
Add a Details input field to the Create Purchase
Order
popup. Initialize the Details field with the Requisition’s
Description
 |
 |
|
How to Model |
Located in |
|
Add Display/Row. Name it Details Row. |
Create Purchase Order popup |
|
Add Display/Label. Name it Order Details:. Add Display/Text Input Field. Name it Details. |
Details Row |
|
Link Requisition Row/Description/<Value> to Create Purchase Order/Details Row/Details/<Value>. |
Initialize process |
3. Add a Price input field to the Create Purchase Order popup.

|
How to Model |
Located in |
|
Add Display/Row. Name it Price Row. |
Create Purchase Order popup |
|
Add Display/Label. Name it Order Price:. Add Display/Number Input Field. Name it Price. |
Price Row |
4. Create a Submit Order button, used after selecting a supplier to issue the purchase order.
|
How to Model |
Located in |
|
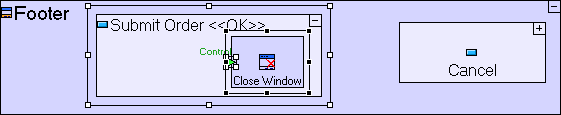
Rename the OK button to Submit Order. |
Create Purchase Order/Footer |
|
Add Display Actions/Close Window. Add a Control trigger (through Add Element). |
Submit Order button |
Note
that
in the sample project provided, the application model includes a
validation warning, due to the fact that the Close Window
sub-process of the Submit Order
button has a mandatory trigger (Control)
with no flow into it, which means that as it stands, clicking the
Submit Order, will not
close the
popup.
This issue will be solved in the next stage,
once flow is defined in the next stage.
You may now proceed to Stage 13, in which we are going to learn techniques for managing relational data.
Click here to open the live project in a separate window.